The Fireplace Mantle: Part 2....done!

30 comments:

Wow ...what a ton of work
And this was a lot more complicated than it looks 
because in order to do this project
I used/coordinated the following trades:

Laborer
Carpenter 
Stone Mason
Stucco Contractor
Plumber
Drywall and Painter
Stone Supplier
Stone Fabricator
&
Cabinet Maker


whew


 There are many nice components to this fireplace...
the first being this huge piece of old train trestle

I purchased it from a company in Salt Lake City

A very interesting piece of history now resides in my living room...
just no cho cho!

Read about it here


The hearth is toped with soapstone 
which is really one of the prettier and user friendly stones available
 This slab was quarried in Brazil
but soapstone can be found all over the world
 I has a wonderful chalky grey look
and is really warm and natural
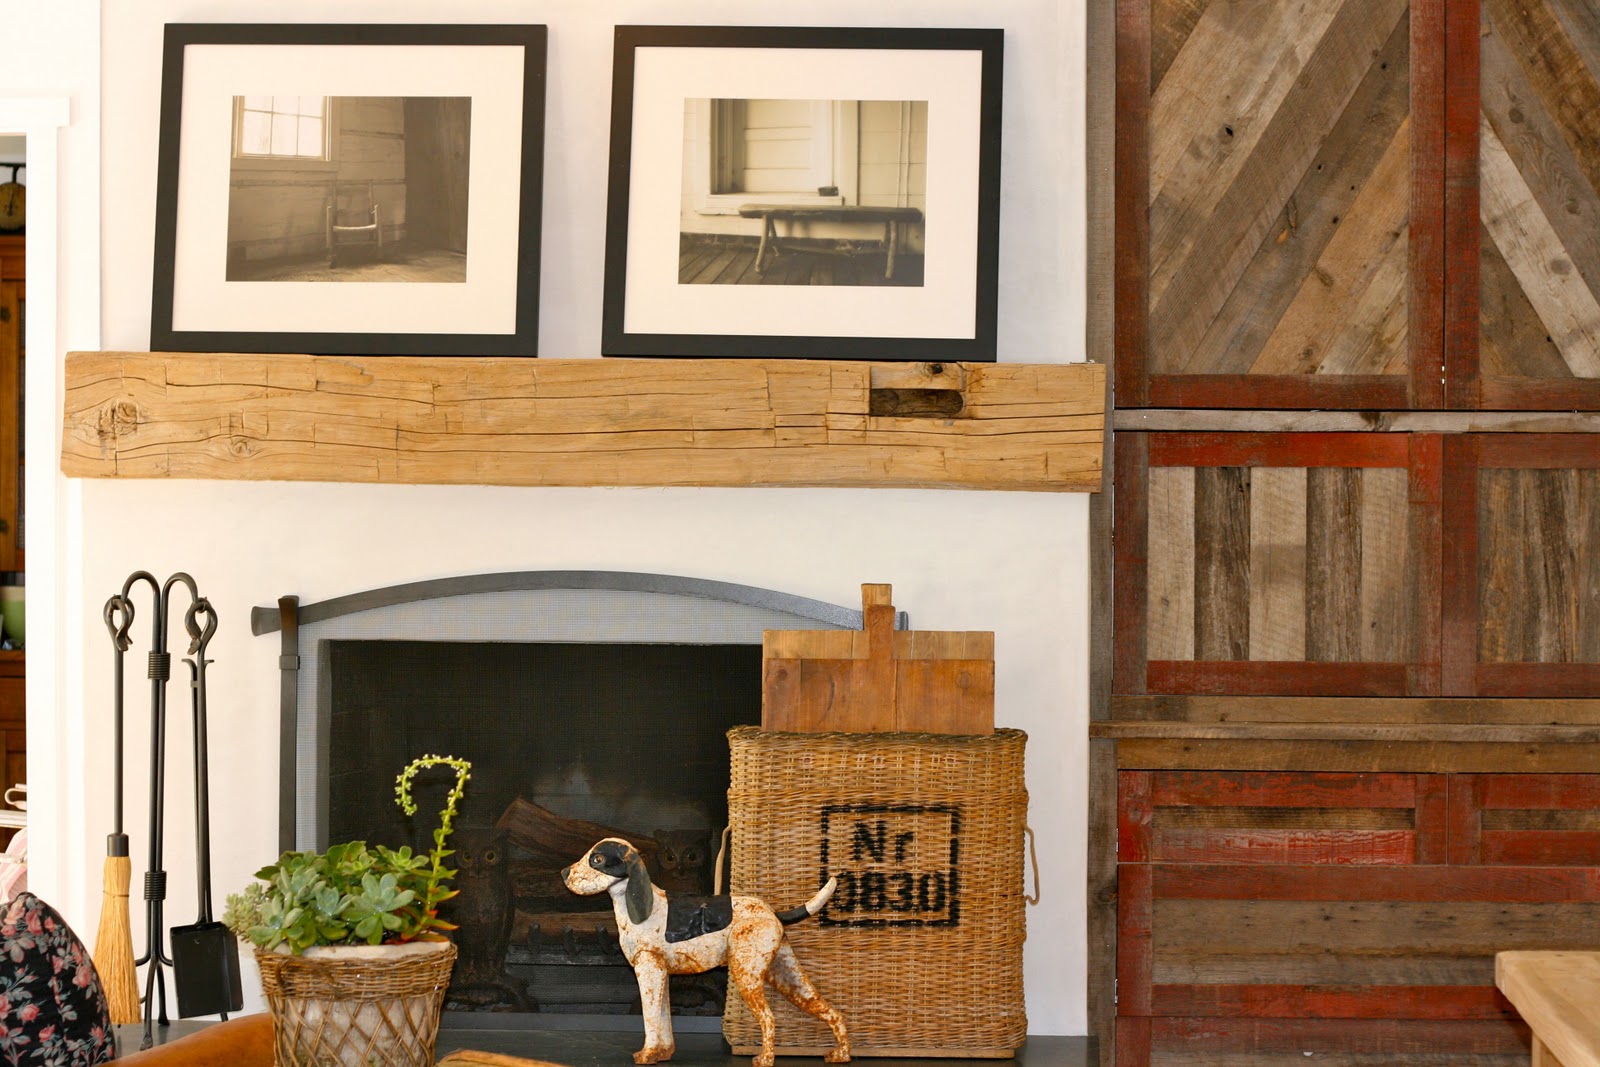
 The actual brick fireplace was given three coats of stucco
with the final coat being
a hard troweled and burnished finish

It is left natural and we did a nice soft bullnose to all of the corners
 for a really clean look

You may have noticed that I pulled down all of the old fake ceiling beams too...
that was fun...!

*think really big sledge hammer*


Peeking out on the right is a new cupboard I designed to house the TV and stereo stuff
It is made from reclaimed barn wood 
and yes it was from a red barn!


 The wood is left in its natural state and it has some wonderful knots
and variation of color

I have to add a word of caution about doing this....
get a good cabinet maker!

 All of this type of wood is very irregular and needs to be planed and modified 
to be useable for cabinet work...but it's doable 
 The doors hinge to the right to keep out of the way of the mantle.  
Here you can see the back of the old wood after it is run through a planer...
it looks like it's new! 
 There are old nails and other things found in the wood too 
so that also makes this a bit more labor intensive
 I did the top two doors on a diagonal for some interest, 
used plain grey barn wood for the fronts 
and the red barn wood as the trim detail

The top is stepped back from the base
for more of a vintage cabinet design

I have some really interesting knobs on order and
will show you those when they get here
 It's a really nice transition now 
and not all chopped up

Although there are a variety of woods used
they all work well when used together in this space

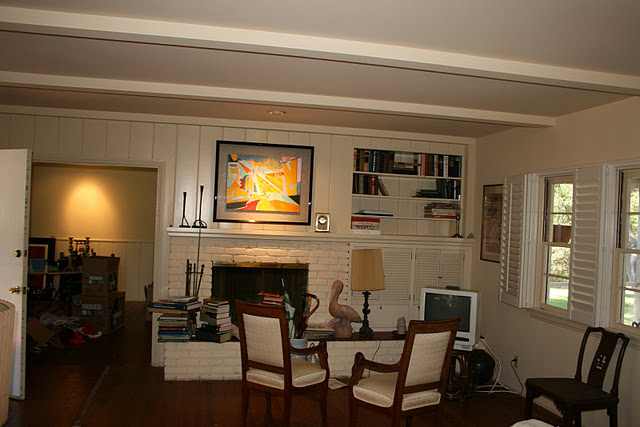
Here is the before below:
Below is my inspiration:
Thank you Ina
 And now finished....
at least this project is!

Have a wonderful
&
creative week

and as always
thanks for stopping by!

~kelley~

The Fireplace Mantel: Part 1

28 comments:
 The Fireplace Mantel
we all seem to love them...
we decorate them 
we stare at them
we dream in front of them 

I was lucky enough to have a beautiful one in the home I recently sold....
but here is a secret...it was sort of a fake!
You turned it on with an electrical switch 
and what looks like stone... 
was really some sort of precast, made to look like real stone stuff....
one great looking
botoxed,  lifted and air-brushed trophy fireplace

But damn...I really loved that mantel!

So now here is what I have to work with....ahhh so lovely
but all real and just waiting for an up date
And yet another fireplace gem in the master bedroom...
notice the stuffed animal (chicken)  on the bed
dreaming of how the fireplace will soon look.
A stuffed chicken can dream...can't he?
 Never one to shy away from a challenge...
I took my cues for my fireplace  renovation 
from the wonderful barn owned by Ina Garten
Now let me just say....this may seem like a stretch
and well
you're absolutely right ...it is
a huge impossible stretch 
but here goes
I have just a few things going against me:
1.  I do not have soaring gorgeous ceilings nor do I live in the Hampton's
2.  I have a smallish budget, which I may stretch a bit, to get it right
3.  Renovations are messy and expensive and you never know what you're getting into until you are knee deep in the crud
4.  The closest I may ever get to Ina Garten is to run into her at the airport...maybe...probably not... OK never
 We started ripping things open when we decided to put in hardwood floors.
It's always nice to have a wheel barrow in the living room right?
And at first I thought I might try to save some of the fireplace mantle
 (notice the blue taped off area)
but guess what?
all gone

except the fire place

Oh and I got a big hole in the floor for my efforts

Here are the elements that I will use for this project
Soapstone
Reclaimed Trestle Timbers
Reclaimed Barn Wood
Hard Troweled Stucco
&
a bit of Ina inspiration

Wish me luck!

"POP UP" mudroom details

16 comments:
No,  those are not the ones in my laundry room...but aren't they interesting?

Find them here

I really doubt my collection will get much bigger...but ya never know, right?!
moving right along...
 into the land of tide and basil...
I really am a true Mrs Meyers junky...
I love the stuff
Old vintage jars are great for storing  
powdered detergent and Oxy clean
Another item in the mud room that is indispensable for us
is this great orchard rack from Gardeners Supply
It not only stores fresh things like tomatoes, squash and apples, but I use it to store onions, garlic and potatoes too


This is some sort of a message board
and I stuck in a few vintage seed packets for fun
The graphics are really interesting

 I am never with out 
 "Boat and Totes" from LL Bean

Here  is my storage solution for the rest of the pantry...
this is metro shelving from the Container store

You can add shelves as needed
and they offer these great zippered canvas covers
as a solution to hide the clutter 
I used 4 of these in all...
when we get ready to do cabinets in here
these will work in the garage or as additional storage someplace
Over the washer and dryer I added a stainless shelf from Danver
and hung
those great prints from artist Doug Strickland

Does the Mrs Meyers label somehow  match Doug's work?

I think it does....how funny!


On top of the washer and dryer 
is a stainless top from John Boos for folding laundry

Yes, that is a vintage laundry cart...it actually gets used!
OK, I think I've spent enough time 
on the "POP UP" laundry/mudroom

Next project....barn wood!

~Kelley~

Whisk Broom Window Covering

23 comments:
 Sometimes the simplest of everyday objects can find a new life,
as something other than originally intended

 We have a really funny odd room between the kitchen and the garage,
 which has become one of the most used spaces in the little Ojai house
 I call it my "pop-up pantry"...but it functions as both a mud room and laundry room too
 This room will eventually get a total makeover, but in the mean time I needed storage...so I ripped out all of the useless goofy cabinets that were here and  gave it a fresh coat of white paint.
I thought it might be fun to try something new over the top of the window...not really a shade but more of a detail!
 How about using a collection of vintage whisk brooms hung on an old rack with hooks?
Well...alright-ee then lets do it!
 Now this might not do much in the way of covering the window...it looks really fun and costs just a few dollars
 Here is a peek of the "pop up" pantry/laundry/mud room
I will share a few more details on the next post!

Thanks for checking in...
cheers to a great week ahead!

now where did I leave the dust pan?

kelley
; 0 )